


After reading this tutorial, if you follow the instructions carefully and if your hardware is in good working condition, and your motherboard have enough customization options, you should get a fully functional Windows 98 or Windows Me operating system.
At this moment this manual was tested on:
- Gigabyte X58-UD3R rev. 1.0 with BIOS F10, F11 – for Windows 98 installation
- Supermicro x8SAX rev. 1.02 and 2.00 with latest BIOS – 03.08.2013 rev. 2.0b. – for Windows 98 and Windows Millennium installation.
Importantly, I am not a software developer or a certified legacy OS expert, my methods are flawed and do not claim to be the only true answer. So, anything you do according to these instructions is done at your own risk. If something does not work, I am ready to provide timely technical advice in our forum. You can ask questions and answer them both in Russian and in English.

1) Who this material is intended for.
First of all, this article is intended for owners of 3D accelerators based on 3dfx VSA-100 manufactured by zx-c64, namely:
- The first prototypes of the Voodoo 5 6000 128/256 Mbytes
- S.U.X. 6000 PCI 128/256 Mbytes
- Strange God PCI 128/256 Mbytes
- Challenging PCI 64/128 Mbytes and Challenging PCI Prototypes (green PCB) 64/128 Mbytes
If you don't have one of these accelerators for some reason, you can buy them by contacting the manufacturer through our forum (feel free to post in english). Owners of original 3dfx Voodoo accelerators based on VSA-100 can also use these instructions, as well as those who have a video card from another manufacturer.
2) Computer Configuration.
- - Processor: Intel Xeon x5698 4.4 GHz (2 cores + HT) / Intel Core i7 990x Extreme Edition
- - Motherboard: Supermicro X8SAX rev. 2.0 (Intel x58)
- - RAM: 6x4GB DDR3 1066 MHz (Kingston HyperX Genesis)
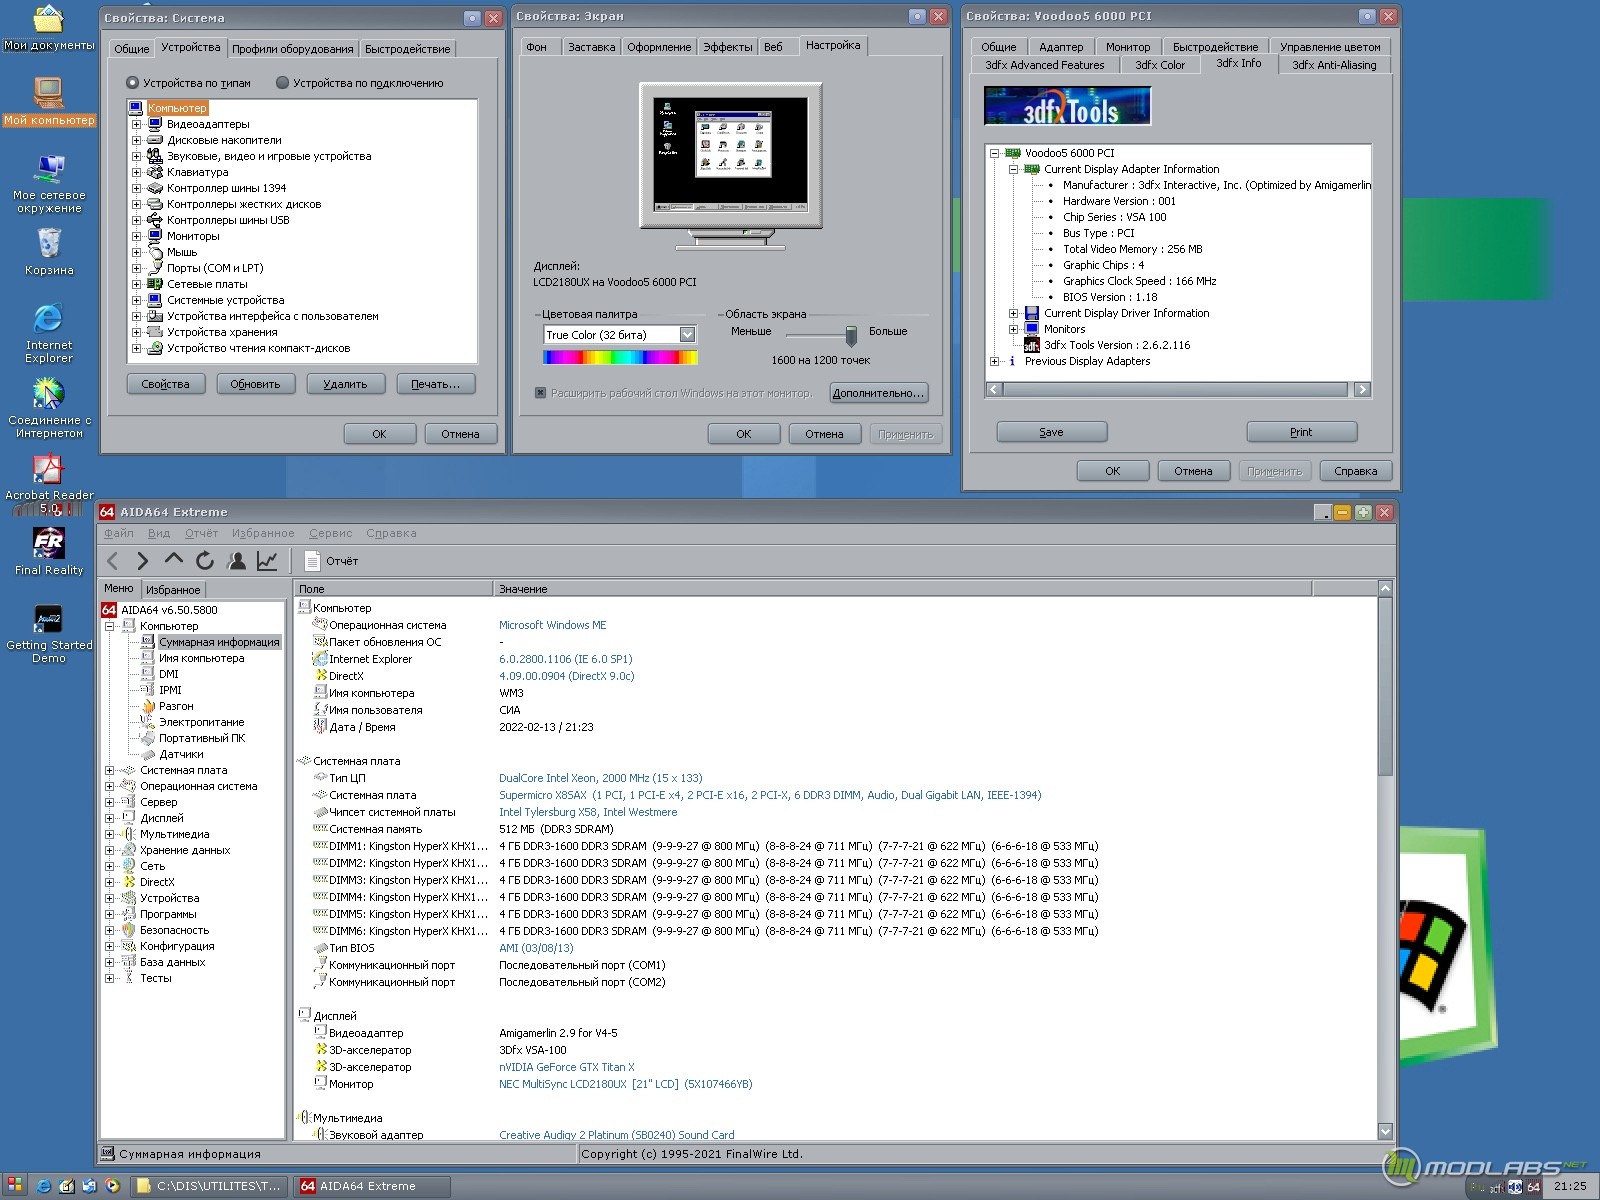
- - PCI-Express graphics card: NVIDIA GeForce GTX TITAN X 12GB
- - PCI graphics card: zx-c64 Strange God PCI 256 MB / S.U.X 6000 Special Edition (VSA-100 rev. 320) 128 MB
- - PCI sound card: Creative Sound Blaster Audigy 2 SB0240
- - SSD: Crucial BX500 (CT120BX500SSD1) 120GB
- - DVD-ROM: ASUS DRW-24DR5MT
- - Rosewill RNX-G1 USB 2.0 Wi-Fi Adaptor (When wired network is not availble, Windows 98/Me compatible)
- - TP-LINK TG-3468 (Realtek RTL-8168E PCIe (Wired Gigabit Ethernet, Windows 98/Me compatible)
- - PS/2 keyboard and optical mouse
- - Windows 98 SE Russian version + cumulative service pack 1.0.0.2 for the Russian version of Windows
3) Before installing OS:
3.1 Before attempting to install Windows 9x, I strongly recommend checking the assembled machine for stability of all components. To do this, after building it, install a clean version of the officially supported by your hardware operating system, such as Windows XP SP3 or newer, and perform a number of stress tests, including using the accelerator from zx-c64 or similar.
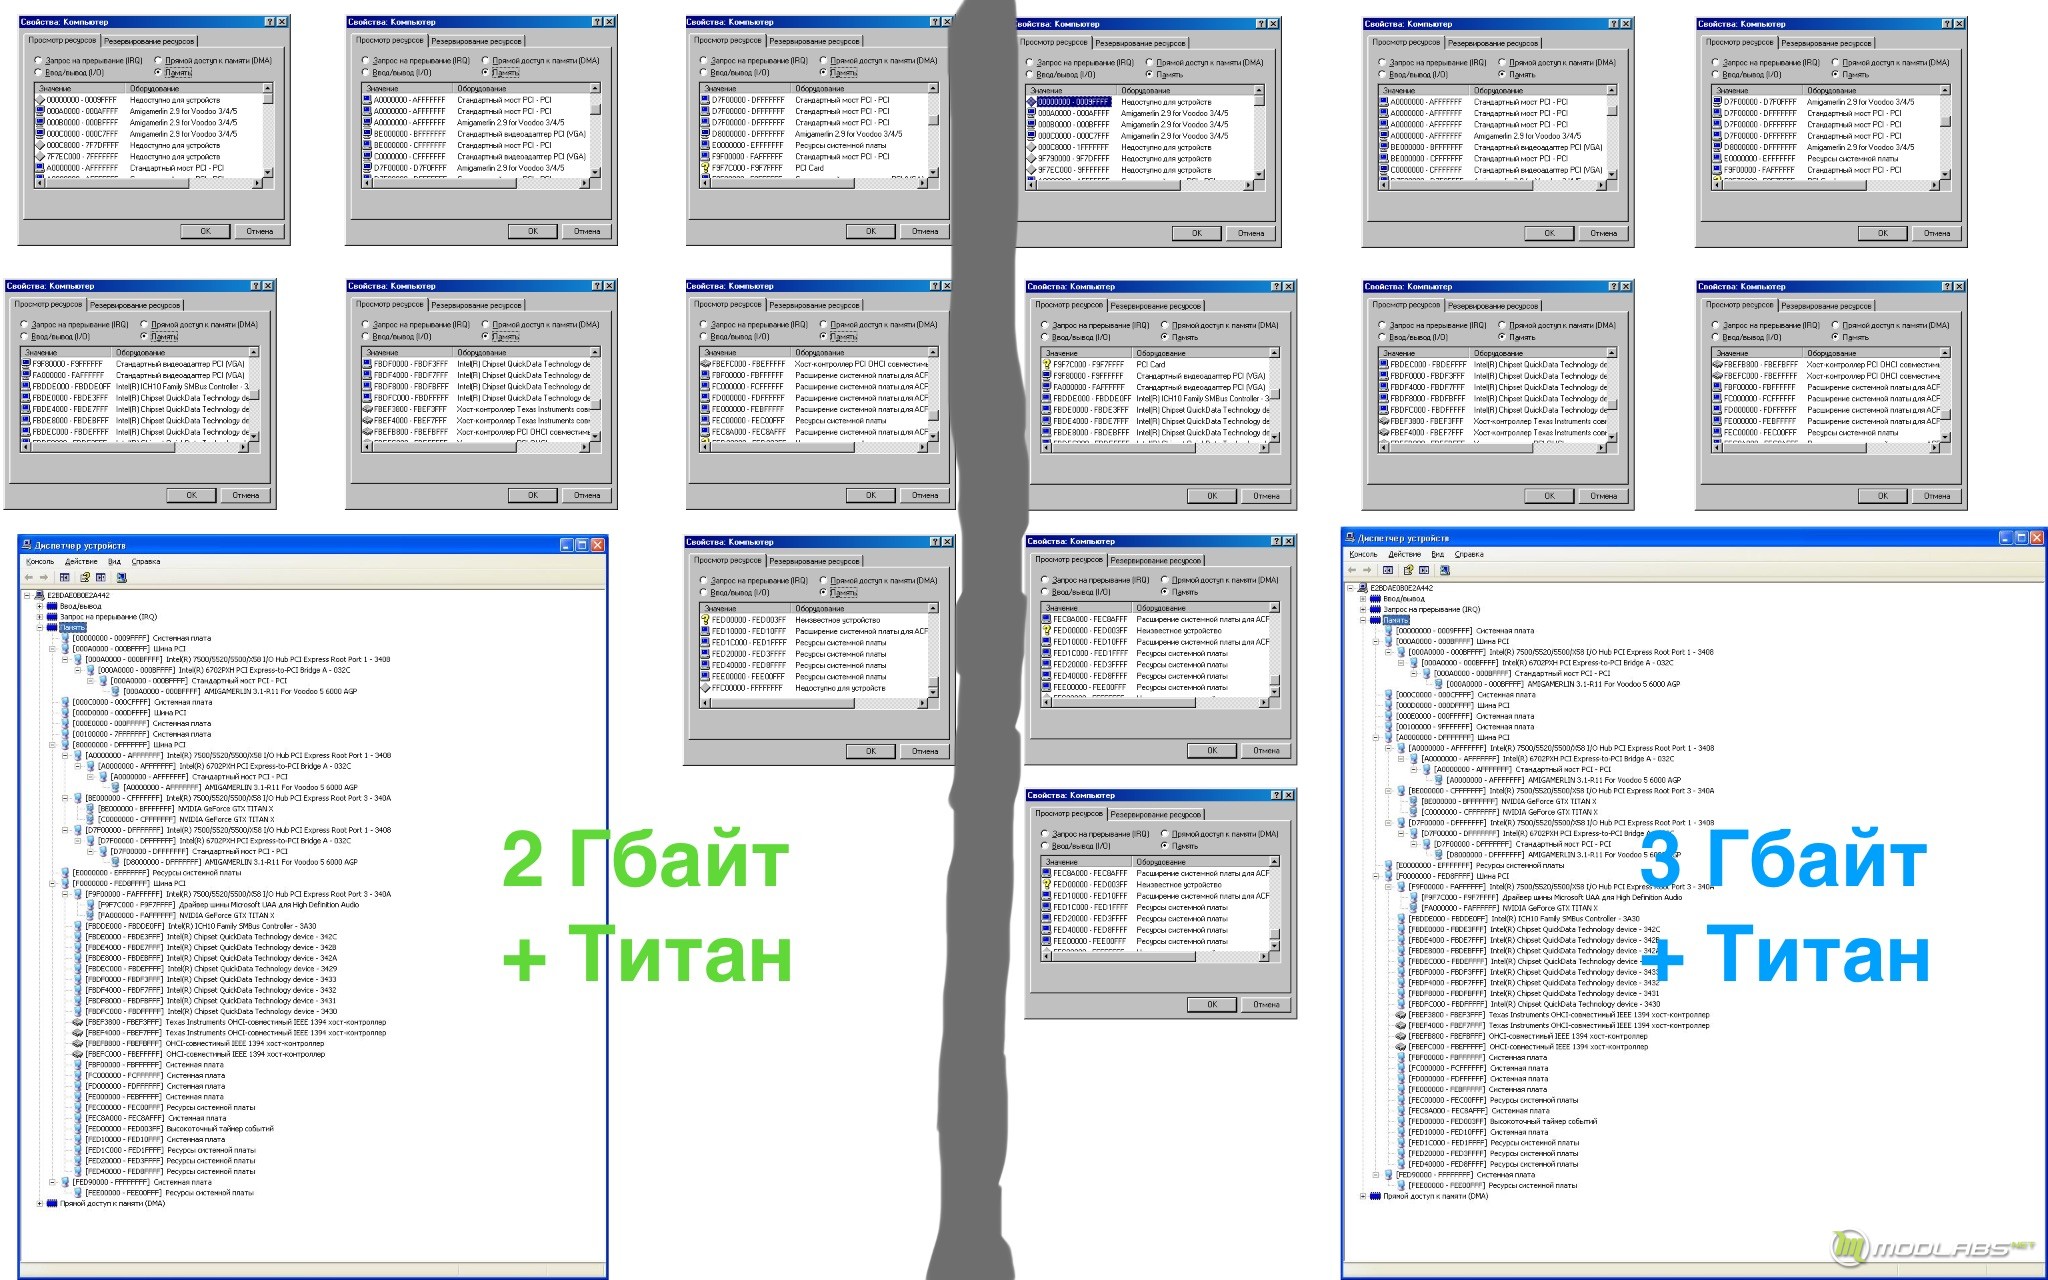
In addition, using the standard "Device Manager" tools in Windows XP, for example, it is advisable to get a resource allocation map for all devices in the system and save it on screenshot. This way you can see which device in Windows 98 you are installing the driver for (especially true for manual installation, e.g. HPET driver).

Also, I strongly recommend you to use SATA DVD-drive and SATA SSD/HDD devices and connect them to SATA_0 and SATA_2 ports, connected to Intel ICH10R.

3.2 After you have made sure that everything works properly, prepare:
a. Windows 98/Me boot disk.
b. A separate CD-disc (you can also burn custom Win9x bootable discs with all necessary files described below) or USB-drive (USB-drive SHOULD be formatted in FAT32 file system to prevent incompatibility) containing the unpacked utilities:
- - MTRRLFBE.EXE.
- - Rudolph R. Loew's Patchmem (Memory limitation patch for Windows 9x) or its analog
- - Limem.exe (the Windows 9x counterpart of himem.sys, with DOS and Windows RAM limitation options)
- - Any DOS file manager (Norton Commander, Volkov Commander, DOS Shell, etc.)
- - Optical drive driver (you can take the one that comes with Windows 9x and use on a CD to boot it with CD-ROM support), and mscdex.exe
- - A set of required drivers for the chipset, graphics accelerator, network adapter and sound card.
Experimental Drivers for Intel x58 (most devices) are available here.
We recommend any of these drivers for VSA-100-based accelerator: 3dfx Reference Drivers, Amigamerlin 2.9, Raizel64 Evolution 1.01.16
Windows 9x installation files and a set of cumulative updates for your version of Windows 9x.
- English version of cumulative updates package for Windows 98 is here, for Windows Me here.
- Russian version of cumulative updates package for Windows 98 is here, for Windows Me here.
c. For installing Windows 9x and, preferably, for subsequent operation, I recommend using a PS/2 keyboard and mouse
d. It is advisable to put all utilities on CD-disk or USB-drive in a separate folder, e.g. BOOT, then create autoexec.bat and config.sys which will prescribe automatic loading of drive drivers, will run the file manager. When writing the paths in the prepared files, don't forget that they will be placed on drive C: If you're installing Windows 98, limem.exe must be renamed to himem.sys, and then in config.sys write its use as follows:
DEVICE=C:\BOOT\himem.sys /LI
Thus, the amount of RAM for MS-DOS and Windows 98 applications will be limited to 512 MB. To set a smaller size, please consult the documentation on limem. Setting it to a higher value may cause the operating system to be unstable. I don't recommend it. In the case of Windows Me, it is not necessary to use limem, instructions for limiting memory space will be described below.
4) Configuring the BIOS of the motherboard.
Proceeding to this step you know for sure that the system is up and running, the CDs with the operating system and supporting software are prepared and readable in the optical drive of the Intel x58-based system. It is time to do the preparatory BIOS setup of the motherboard.
I will write the name of the options using the example of a Supermicro X8SAX. The material describes only those options which, in my opinion, affect the correct operation of Windows 9x! Just because the motherboard BIOS preset disables devices (e.g. USB) that will be needed during system operation, does not mean that they cannot be used after OS installation! Right now, anything that is better to do without is disabled until Windows 9x is fully operational. Once the OS is up and running, some of the options can be painlessly enabled.
4.1 The most important factor in making Windows 9x work is the disk subsystem. It is the SATA controller operating mode that determines most of the installation success, so I recommend that you start the BIOS setup from this menu item:
Advanced -> IDE/Floppy configuration ->
- - SATA#1 Configuration set to Compatible mode, Configure SATA#1 as: should be set to IDE.
- - Set SATA#2 Configuration to Disabled
I do not recommend to use more than two SATA devices for Windows 9x! Here and below, we will take an example of one SSD and one optical drive. If you have more devices, it is possible to make them work in Windows 9x, but this requires additional settings and drivers which will not be covered in this article! Also, I strongly recommend you to disable all additional IDE/SATA controllers at least on the stage of installing and running Windows 9x.
IMPORTANT NOTE: If you have any issues with drive detection during POST:
- - Clear CMOS, sometimes just load BIOS defaults is not enough.
- - Make sure your SSD/HDD does not have any created partitions! If partitions are created, please, connect your SSD/HDD to another working machine and delete all partitions.
4.2 Advanced -> Advanced PCI/PnP Settings
PCI IDE BusMaster -> Enabled
Boots Graphic Adapter Priority -> Other (in my case this means that booting will be performed from any graphics adapter except the one in the top PCI-Express slot)
4.3 Advanced Chipset Settings
- HDA Controller -> Disabled
- Intel VT-d -> Disabled
- S-IOV Supported -> Disabled
- Intel i/DAT -> Disabled
- Active State Power Management -> Disabled
- Extend PCI HOLE -> Disabled
- USB Functions -> Disabled*
- USB 2.0 Controller -> Disabled*
*- If for some reason it's impossible to fulfill the conditions of item 3.2.c., you can leave these options on. If you are using USB-drive instead of CD/DVD disc to copy necessary files, temporary turn on USB controller before installing Windows 9x.
4.4 Configure advanced CPU Settings
At least in the beginning, It is better to set the CPU Ratio to 15 (In this case CPU frequency should be 2 GHz).
With this frequency of your Core i7/Xeon, the probability of over-performance problems is minimized, which means that in basic configuration and testing you will not run into unnecessary problems. As an example, I will give you the game Rogue Squadron, which on the rated speed Intel Xeon x5698 sins with stability problems: it is impossible to skip start rollers, objects hang in the air or perform strange actions in the game. Also, at high CPU speeds it can have uncontrollable character acceleration if V-Sync is turned off (Quake II). In general, at least for setup and basic tuning, it is best to stay around 2GHz.
- MPS and ACPI MADT ordering -> Legacy ordering
- Intel Virtualization Tech -> Disabled
- Execute-Disable Bit Capability -> Disabled
- Simultaneous Multi-Threading -> Disabled
- Active Processor Cores -> 1
- Intel EIST Technology -> Disabled
- Intel turbo Boost -> Disabled
- C1E Support -> Disabled
- Intel C-STATE tech -> Disabled
- ACPI T State -> Disabled
4.5 ACPI Settings
- High Performance Event Timer -> Enabled
- USB Device Wakeup From S3/S4 -> Disabled
- ACPI Aware O/S -> Enabled
- Suspend mode -> S1 (POS)
- AMI OEMB Table -> Enabled
- ACPI APIC support -> Enabled
- APIC ACPI SCI IRQ -> Disabled
- Headless mode -> Disabled
- ACPI Version Features -> ACPI ver. 1.0
5) Preparing to Install Windows 9x
Before you directly install Windows 9x, I STRONGLY recommend that you recreate the partition(s) on your primary drive and format them. And I STRONGLY recommend that you do this not on another computer, but on the one you will be installing Windows 9x on and only after switching the controller to a mode suitable for Windows 9x installation!
If you are using USB-drive instead of CD disc to copy necessary files, before booting from Windows 9x CD, do not forget to turn on USB in BIOS. It is strongly recommended to insert your USB-drive before turn on your computer.
5.1. Boot from the Windows 9x CD
5.2.. Boot into CD-ROM drive support mode
5.3. Run fdisk and create as many partitions as you want. In my case I have only one partition, for the full capacity of the disk. If I have a partition longer than 32 GB, fdisk will not show the correct size, this is normal. Make the primary partition active.
5.4 Reboot and follow the similar boot options in 5.2.
Format the main disc with option /s, it should copy the system files to it. If format utility does not support /s key (Windows Me format utility informs you about it), format system drive without this option and refer to 5.8.1.
5.6. insert the second disk/or go to your USB-drive with the files you are prepared earlier. Start file manager installation through command line or start it directly from CD.
5.7. Using the file manager copy all the prepared files to the system disk. If you have prepared everything beforehand and checked if the boot paths in the system files on CD/USB-drive are correct, just copy everything to the formatted data storage device.
5.8. Reboot and boot from the formatted data drive. If everything is done correctly, you will have a file manager window in front of you. The high memory driver will be installed, the CD drive driver will be installed.
5.8.1. If you can’t copy system files with format /s option, after formatting system drive and 5.7 do the following:
- Using file manager program, create Windows folder on your system drive
- In Windows folder create system.ini file like this:
[386enh]
MaxPhysPage=20000
[Vcache]
MaxFileCache=262444 //This string is not necessary and can be inserted later, after Windows 9x is installed and running.
5.9. Locate the copied Windows 9x distribution on the system disk and run Setup. If the standard installer hangs before checking for data storage errors, you should reboot and go to the folder WIN98 (WIN9x for Me), which is inside the folder of the Windows 9x distribution, and start setupcor from there.
5.10. If you created Windows directory like described in 5.8.1, when setup utility asks you about Windows destination folder, choose the same Windows directory as you created in 5.8.1.!
5.11. If you used limem.exe -> himem.sys and set it up in config.sys, on a first reboot during installation process, setup program will copy original himem.sys over renamed limem. To fix this issue, boot from CD or boot in command prompt if possible and copy limem -> himem.sys once again. Also, one more time check config sys to make sure that right DEVICE string is on it’s place. Reboot manually to continue.
If everything is done correctly, after a couple of restarts, you will get to the Windows 98/Me desktop.
6) Configuring Windows 98.
6.1. Go to the Device Manager. Don't be frightened by the chaos with "!", at the end of the process everything will be clear! Under "Hard Disk Controllers" go to the properties of the "Standard Combo Controller" and under the "Setup" tab select "Use Primary Channel Only". Click "OK", reboot. The system will find the new devices, including the data drive and CD drive. For the data drive, enable DMA mode and reboot.
6.2. Install the cumulative update package for your version of the operating system. Remember, various crashes and freezes can occur when USB is enabled! If USB controller is on, I recommend to turn it off until the updates are installed!
6.3. After installing the updates you can start to install the drivers from this kit. Those that are already installed as "Standard devices" or "Standard bridges" should not be touched, in our experience it does not affect anything. Install only those drivers which are not installed at all.
6.4. If the system has two video cards, unsupported Windows 9x network devices, or unsupported sound controllers, do not be sad. Soon they will be gone. For now, don't worry about them. What's worth looking at, however, are two devices and one group:
Devices:
"System board extension for ACPI BIOS" - it will be duplicated and highlighted "!" with a conflict message. I wasn't able to remove it by picking a driver or changing the range of resources occupied, so I just scrubbed it from the system.
NOTICE: When I comparing Windows XP memory resources map with Windows 9x, this device should be «Motherboard resources», but manual driver installation do not fix this «!» If someone knows how to fix this issue more correct way, please, let me know.
Second, the "Unknown Device" is nothing but HPET (High Performance Event Timer in Supermicro terminology). You need to install driver for it manually. Point to /Driver folder/HPET.inf (I have renamed original file to make sure it will be easy to find it), then select High Precision Event Timer in the Intel driver group and install it.
NOTICE: To make sure that this unknown device is HPET, please, check Windows XP memory resources map and compare it with one from Windows 9x.
In Windows 98 you can see the "Other devices" group, that will not be expanded, so you will need to reboot into safe mode, expand this group, remove the unknown device and reboot as normal. After that, the system will detect the device and call it High Precision Event Timer. The system will have two timers. If so, once again please, check Windows XP memory resources map and compare it with one from Windows 9x.
6.5. After you have one conflicting device and several devices known to you personally for which there are no drivers, do the following: go to Device Manager, select the Hardware Profiles tab, then copy the current profile and name it "Temp". Then go to the "Devices" tab and start deleting those devices for which there are no drivers and the one device that has a conflict (the Motherboard Extension for ACPI BIOS). When uninstalling each device, choose the option where the system only removes the device from "Original Configuration", the system will ask for a reboot. Uninstall. After there are no unnecessary devices left, go to the "Hardware Profiles" tab again and delete the newly created "Temp" profile. Now you can reboot.
6.6. During the reboot I recommend to enter DOS (if you have Me, boot from CD) and apply the Loew's Memory Limitation Patch to your OS. Reboot again and get to an OS with a completely clean Device Manager.
6.7. Put drivers, programs and games.
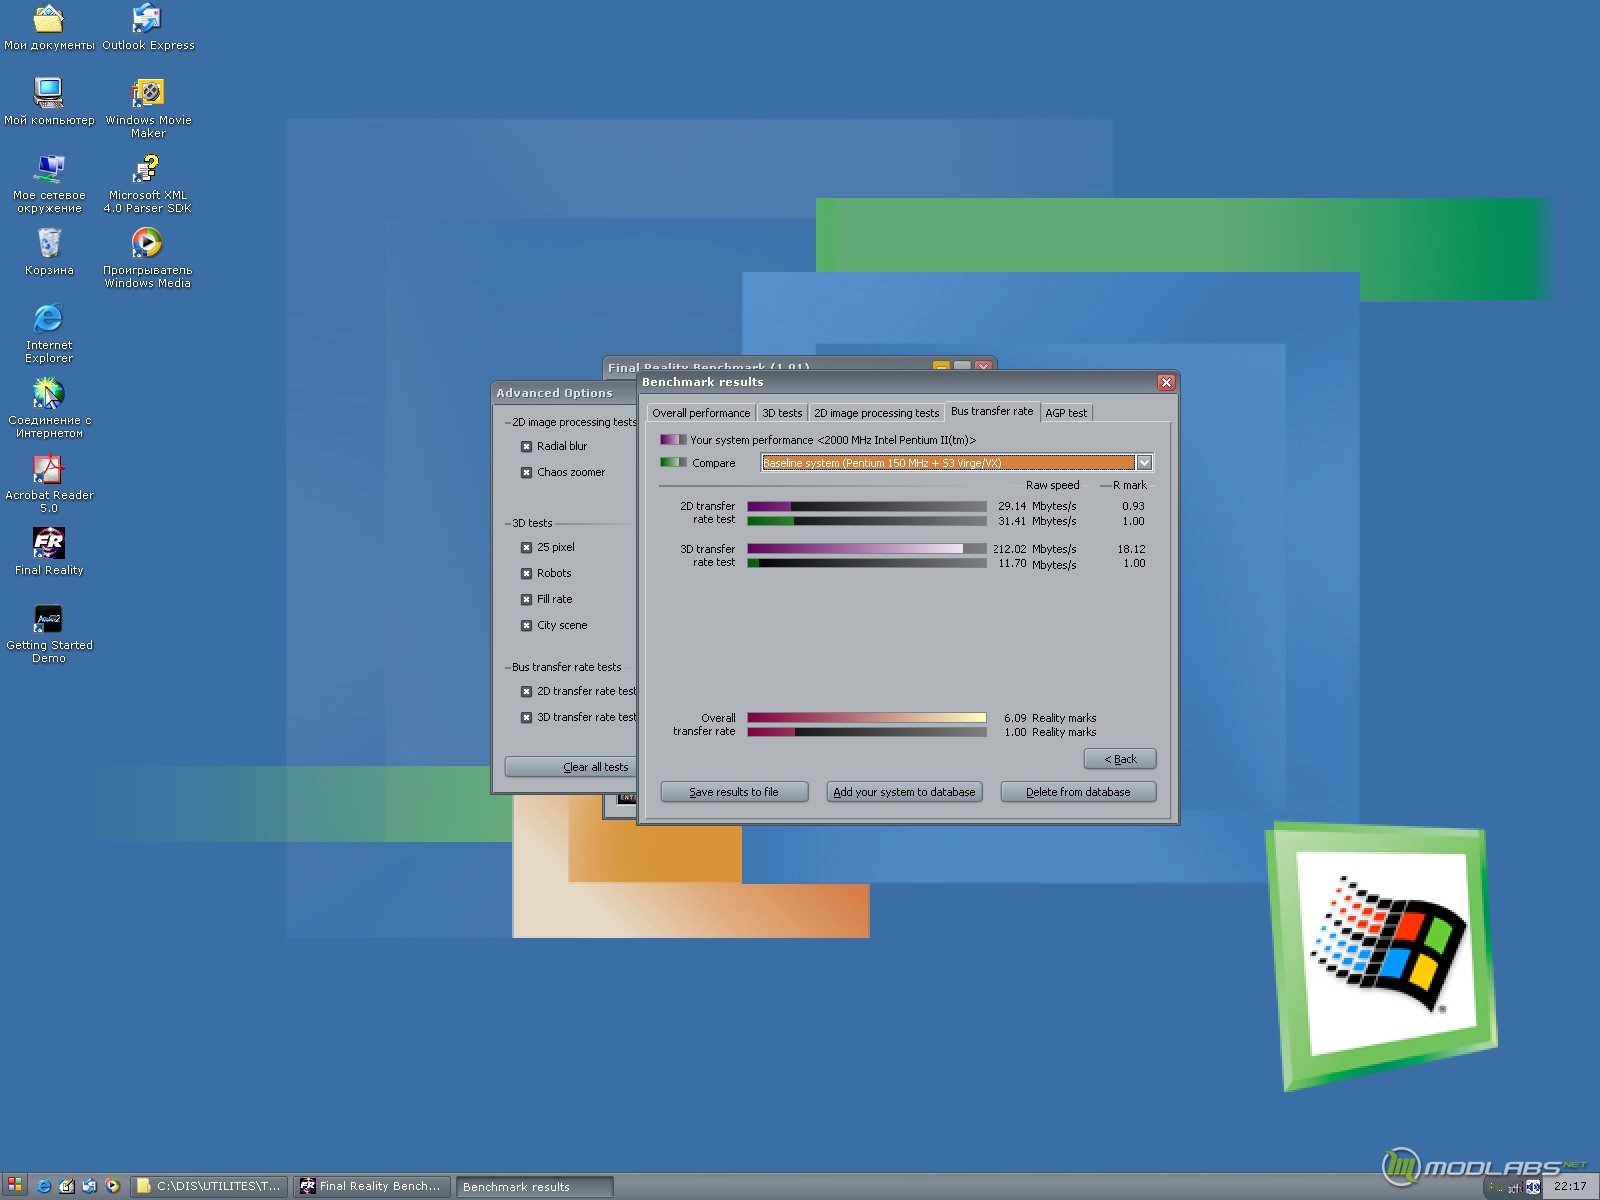
6.8. For those systems, which in addition to graphics cards from zx-c64 have installed other accelerators (for later operating systems) and / or the amount of RAM exceeds 3 GB, a possible noticeable slowdown in 3D applications. According to the preliminary version, it is connected with Write Combine technology malfunctions. If you have such problems with your zx-c64 accelerator, put the following line into autoexec.bat before you boot Windows 98:
C:\BOOT\MTRRLFBE.EXE LFB WC
You can check if this solution works with the graphics bus throughput test from the Final Reality package. For the PCI66 bus, the normal value is around 210 MB/s. For the PCI33 bus, a normal value is in the region of 100-110MB/s.
WARNING: When using MTRRLFBE.EXE I recommend using the original himem.sys from the Windows 98 package and I also recommend running MTRRLFBE.EXE after all programs and drivers in Autoexec.bat. This file can be included in the Autorun menu and run directly from Windows 98, but in this case the bus speed for 2D processing can be severely limited!
6.8.1. In case you are using Windows Me, just put MTRRLFBE.EXE LFB WC shortcut in automatic stratup menu. In this case (Windows Me) 2D bus speed is significantly lower than in Windows 98 - 30 MB/s instead of 220+ MB/s. But in 3D mode bus performance is quite good - 210-214 MB/s. I will investigate this question in future.
6.9. If after Windows Me installation you decided to enable USB, it’s OK. But be prepared that on first system boot after enabling USB in BIOS, system could wait for some time. If empty desktop background and mouse cursor stays for too long, you can gently press CTRL+ALT+DEL one time. In a task manager you will see few running processes, just press cancel and driver installation should proceed. If it is necessary, choose your x58 drivers folder manually.